

Today’s post is by author Wendy Lyons Sunshine.
Just as mountain climbers need a sturdy harness and strong rope to reach the summit, writers depend on robust digital tools to carry us through to a book deadline.
For my latest book, I wanted tools that would let me efficiently juggle a great deal of content and citations. The first choice for my toolkit was Zotero, a citation manager that lets you grab information with a single click of a browser extension, conveniently links text, notes, and tags to the citations, and outputs formatted citations with a few clicks.
But settling on a word processing choice was trickier.
My wish list
I spent a few years as a technical writer, hammering out data-heavy documents and ushering them through multiple revision and output cycles. When you’re elbow deep in hundreds of pages, continually moving graphics, tables, and chunks of data, the last thing you want is to format, mouse, scroll, or cut and paste more than necessary. The right tool offers shortcuts and flexibility. Our group relied on specialized software called FrameMaker to boost efficiency and maintain quality.
For my own book, I imagined a tool that could likewise weave together varied content: personal narrative, as-told-to stories, case studies, heavily cited exposition, and graphics. At minimum I wanted:
- Auto-generated outlines
- To easily jump forward or back among chapters and sections
- To easily reorganize material in a modular manner, using high-level drag-and-drop (like cut and paste, but on steroids).
Fortunately, the first two capabilities are easy to find. Google Docs and Microsoft Word, for example, both support heading styles and outlining capabilities. My wish for the third capability got me flirting with Scrivener.
Scrivener’s allure
Professional writer colleagues rave about Scrivener’s drag-and-drop flexibility, and I felt compelled to give it a look. After a tutorial, I noodled around with a dummy draft. Scrivener’s “bulletin board” with “notecards” did appear to be a powerful organizational tool, making it easy to focus passages and rearrange content.
What daunted me, however, was how to output a draft and incorporate revisions. From what I could deduce, Scrivener outputs to standard formats, but real editing must be done within Scrivener. That meant any changes that I or someone else marked on a draft (output to Word, for example) had to be input into Scrivener, instead of just accepted into the document. Perhaps I missed something buried in Scrivener’s menus, but I couldn’t see any way to easily and productively collaborate on drafts with my editor.
Stumped, I took a fresh look at Word. Could it be coaxed to approximate Scrivener’s powerful visual and modular drag-and-drop feature?
Ultimately, yes. The trick is inserting many descriptive, often temporary, headings in combination with Word’s styles and navigation pane. Here’s how it works:
Getting Word to behave more like Scrivener
Insert descriptive headings throughout the manuscript. You might insert a heading above each:
- Chapter
- Section
- Scene
- Figure or illustration
- Sidebar
- Any unit of content that needs to be easily identified or moved.
The goal is to clearly identify where a chunk of content begins. By default, that chunk ends where the next chunk (denoted by a heading of the same level) begins.
Assign styles
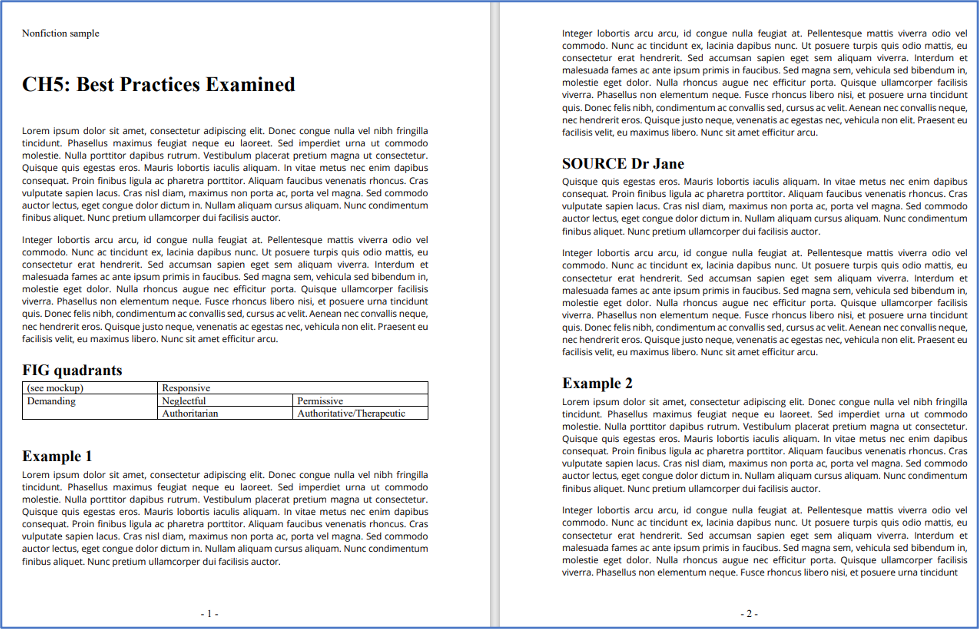
Open Word “Styles” and assign each of the descriptive headings a standardized heading style. Assign “heading 1” style to chapter titles, then assign “heading 2” to other types of content. (This keeps the hierarchy as flat as possible to begin; more levels can be added later, after you get the hang of it.) Here’s an example of a nonfiction manuscript set up this way:
Open the Navigation Pane
Now that headings are set up, open the navigation pane via View > Show > Navigation Pane. The Navigation Pane will display vertically along the left of the screen. For the sample pages above, it would look like this:

Use the Navigation Pane two ways. First, you can navigate to specific content by clicking on that specific heading. Second, and most wonderfully, you can reorganize content by dragging and dropping the headings. Navigation Pane headings behave much like Scrivener’s index cards and are easily shuffled around.
Dragging a heading moves all associated content together in one bundle. This works beautifully across a large document and is far easier than trying to cut/paste/or drag blocks many pages apart.
Craft headings strategically
By crafting brief, standardized headings, you’ll make it easy to scan and browse the Navigation Pane. I sometimes use ALL CAPS to make certain information more prominent.
That’s why in the sample shown above, chapter is shortened to CH#. This leaves room to see more of the full title in the pane and also to scan visually for chapters across the entire book. Source interviews are <SOURCE – name>, and graphic elements are identified as <FIG – descriptor>.
For fiction
Fiction writers can adjust this approach for their needs by crafting headings to describe POV, scene, location, interiority, backstory, etc.
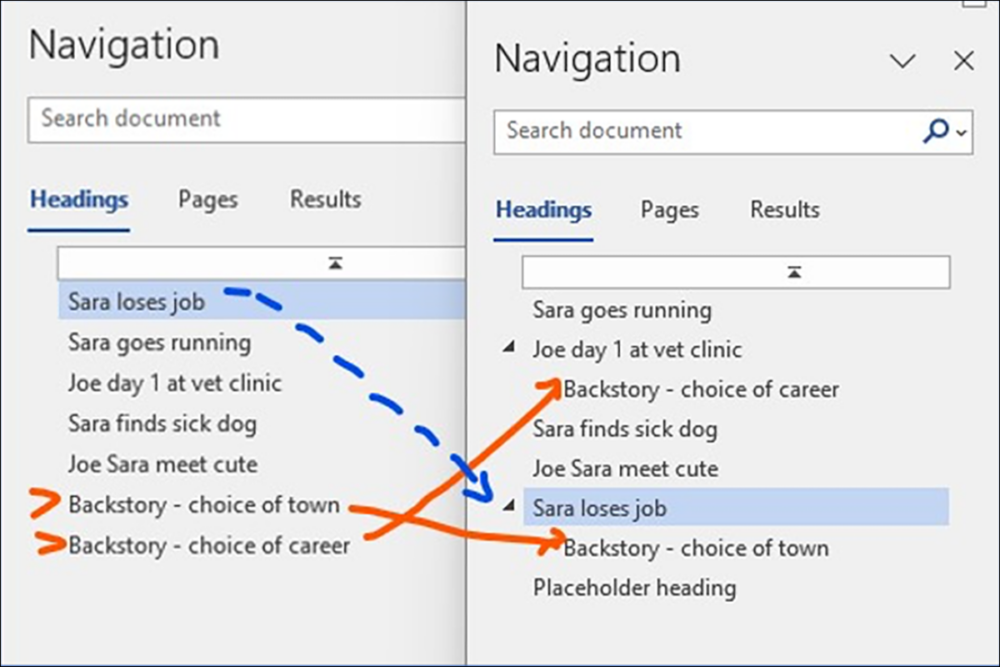
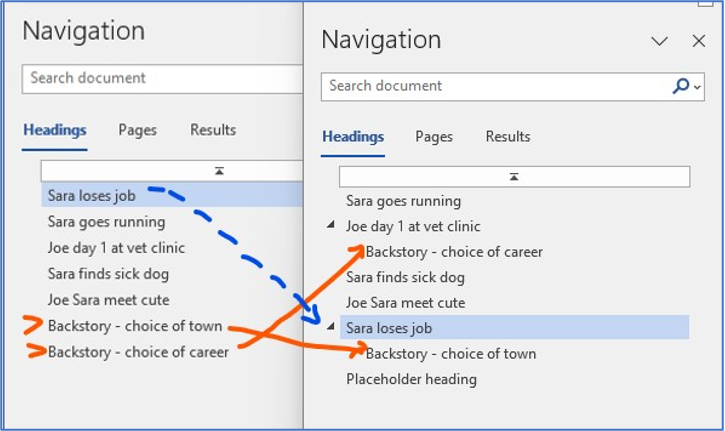
Below, on the left, is an imaginary raw fiction manuscript set up this way. On the right, content has been dragged and dropped into an alternate sequence using the Navigation Pane. Notice that on the right, backstory segments were nested or “demoted” by changing from Heading 2 to Heading 3.
Getting creative
At one point during my book’s evolution, I wanted to keep an eye on word counts. The Navigation Pane helped there, too. First, I checked a chapter’s word count, then embedded that total into the heading format of <word count – chapter number – name>, such as “750 CH8 Attunement” or “5000 CH2 Science of Family.” Then I could scan for chapters that were complete versus those that needed more content.
Last steps
When the draft was ready for final production, all I had to do was strip out superfluous headings and replace abbreviations with the full spelling.
Despite the extra effort of inserting headings and stripping them out later, this strategy was a huge help. It allowed me to play with my book’s structure and track where I had located case studies, visuals, and so on. It reduced scrolling and prevented messy cut and paste errors. As a final bonus, I didn’t have to master new software while under deadline pressure!
Final note: If you run into trouble, double check Word’s advanced settings to make sure that drag and drop is enabled via: File > More… > Options > Advanced > Allow text to be dragged and dropped.


